Busy Baker
This past month has been a lot of fun
trying new recipes, perfecting technique and enjoying some creative moments!
I am slowing putting together my favorite flavors and recipes.
I
have just begun to get the word out about making cupcakes for others and
February turned into a very fun-filled month.
 My
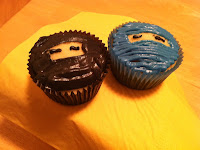
first creative project was some ninja cupcakes. Since I am not familiar with what they look like, Google Images
helped me find a great example which seemed fairly easy to execute. The cake
itself seemed a little more dense that I would have liked, but the flavor was delicious, as only sticks of butter can
do. The frosting was a simple cream cheese frosting and didn't hold its shape as well as I'd like. I used a small writing tip for the blue frosting and a small petal tip for the black frosting to make it look like strips of fabric.
The
next project was for another family at my church whose son was having a
birthday and needed treats for his class as well as some treats to take on a
family get-away. We did three dozen vanilla cupcakes with whipped cream
cheese frosting that were then sprinkled with Pop Rocks...any 8-year-old boy
would love...for his class! I used a different cake recipe and they
seemed to be a bit fluffier with a similar buttery taste. For the family get-away we did a mixed dozen
of six chocolate and six vanilla filled with a marshmallow cream and topped
with a "cloud" frosting.
I used a large round tip for the cloud frosting to get a nice dome shape. I used a large #10 tip for the whipped cream cheese frosting. A good swirl and they look perfect.

I also had the privilege to make treats for our Wednesday night kids group, TeamKID. We went with a mixture of chocolate and vanilla cupcakes all swirled with a whipped cream frosting finished with a plastic heart topper to celebrate our Lord's love for us and Valentine's Day.
Again I used the large #30 tip to create the swirls of delicious frosting. Such an easy decorating style.
 While
I typically stick to cupcakes, some friends asked me to make a spy cake for
their sons birthday. Since I wasn't sure what it could look like, again
Google Images assisted in locating this gem. Though some of my decorating
technique needs some work, this was a fun project.
 The magnifying glass circle was two round vanilla cakes filled with cheesecake mousse and topped with a buttercream frosting tinted to look like silver. The finger print was piped on freehand (as you can tell by the shaky lines). The handle was comprised of two layers of chocolate cake with the same cheesecake mousse filling and topped with buttercream. In addition to the cake, they also wanted cupcakes, two dozen vanilla cupcakes with an almond buttercream frosting tinted the same as the cake and topped with a fingerprint which matched the cake. The chocolate cake was a hit with the eaters, but needed to be tweaked for the baker, too moist and did not set well. Guess it’s back to Pintrest to find a different recipe. Another lesson I learned was to be sure your board fits in the fridge prior to assembling the cake. Good thing the frosting crusted nicely quickly and refrigeration was not a problem (and the fact it is in the middle of winter also helped). For the cake I used a small round writing tip to created the stipes and the fingerprint. For the cupcakes I used a #30 closed star tip for the swirls.
The
final project for the month was a birthday cake for my sister. Cupcakes have been the family staple for the
past few months as I force them to try various recipes, but this cake seemed to
be a nice change of pace. Since the
chocolate cake I used for the Spy cake did not hold up to its expectations I
needed to find a new one and Martha Stewart did not disappoint. Though I failed to look at the ingredients
prior to starting and quickly realized I did not have sour cream, I was
grateful I had some greek yogurt...cake saved!
This dense and fudgey cake sandwiched a
good helping of cheesecake mousse filling (also leftover from the Spy
cake). After seeing a picture of a cake
with ribbons, I thought I would try the technique and see how it turned
out. I certainly need to practice a bit
more and work on keeping my lines straighter.
And as an extra piece of pizzazz, colored sugar for the top of the cake. My still stained hands were a small price to
please my sister! For the ribbons I used a small petal tip. Just a side note, when
using a stencil, don’t press it into wet frosting, when you pull it off,
frosting goes with it. Opps! This buttercream frosting worked great and
crusted up nicely after it set. This
time the board did fit into my fridge.
All in all a very fun and productive
February…not sure what March will hold but I look forward to any future orders
and endeavors. I begrudgingly add the
links below to the recipes because I would rather you just pay me to make them
for you! Happy baking!


Comments
Post a Comment